Navigation
Documentation Home > XPF User Guide > MQTT Add-on
MQTT Add-on
General-purpose messaging and IoT connectivity add-on for Modbus Monitor XPF

📋 Table of Contents - Quick Navigation
🚀 Getting Started (Recommended Path)
- 📚 Broker Options → Choose your MQTT broker
- 🎯 Quick Tutorial → Complete setup walkthrough
- 🔧 Part A: Configure XPF → Set up XPF connection
- 🔍 Part B: Verification Tool → Install MQTT Explorer
- ✅ Part C: Test & Verify → Test your setup
- 🔐 Secure Setup → TLS/SSL, WebSocket, and certificate authentication
- 📡 MQTT Data Reception → Receive MQTT data and update monitor points
📖 Complete Documentation
- 🌟 XPF Features → Unique bidirectional capabilities
- � Advanced Configuration → Topic and message configuration reference
- 🛠️ Production Examples → Real-world setups (HiveMQ Cloud, EMQX, certificates)
- ❓ Troubleshooting → Common issues and solutions
- 📚 Resources → Documentation and community
Overview
The MQTT Add-on enables Modbus Monitor XPF to publish and subscribe to MQTT brokers for general IoT messaging, cloud integration, and distributed system communication. This add-on provides:
- Universal MQTT Connectivity: Connect to any MQTT broker (AWS IoT, Azure IoT, HiveMQ, Mosquitto, etc.)
- Bi-directional Communication: Both publish monitor point data and subscribe to control commands
- Advanced Security: TLS/SSL encryption, client certificates, and authentication support
- Flexible Topic Management: Custom topic structures with dynamic variable substitution
- JSON Message Support: Structured data publishing with configurable JSON formatting
- Quality of Service: QoS 0, 1, and 2 support for reliable message delivery
- Retained Messages: Store last known values for new subscribers
Add-on vs Core Features
MQTT Add-on provides general MQTT messaging capabilities for any broker, while ThingSpeak Add-on is specifically designed for ThingSpeak cloud platform integration with dedicated features for channel management.
XPF's Revolutionary MQTT Capabilities
Modbus Monitor XPF is the only tool that provides complete bidirectional MQTT integration in both Client and Server modes - eliminating the need for multiple software tools and dramatically simplifying MQTT development and deployment.
Unique Bidirectional Architecture
Industry-First Capabilities
XPF combines Publisher + Subscriber + MQTT Test Tools in one application:
Publisher Mode (Client Mode Active) - XPF polls Modbus devices and publishes data to MQTT broker - Perfect for: Sending sensor data, status updates, alarms to cloud
Subscriber Mode (MQTT Data Reception)
- XPF receives MQTT messages and updates Monitor Points grid in real-time
- Perfect for: External data integration, multi-protocol monitoring, development testing
- Works independently: No need for Modbus Client/Server to be running
Built-in MQTT Test Tools - Integrated MQTT client for testing and debugging - No need for separate test applications - Save hours of setup time and eliminate tool confusion
Why This is Revolutionary
| Traditional Approach | XPF Integrated Approach | Time Savings |
|---|---|---|
| Modbus Client Software | XPF Client Mode | |
| + Separate MQTT Publisher | (Built into XPF) | 60-80% faster |
| + Separate MQTT Subscriber | XPF Server Mode | |
| + MQTT Test Client | Built-in Test Tools | |
| + Integration Coding | (No coding needed) | |
| = 4+ separate tools | = One XPF License | 75% cost reduction |
Bidirectional Use Cases
Industrial Automation (Both Directions)
Uplink (XPF Client to MQTT):
  - Temperature sensors to Cloud dashboard
  - Production counts to Analytics platform
  - Alarm states to Notification system

Downlink (MQTT to XPF Monitor Points):
  - External sensor data to Monitor Points grid
  - Cloud service data to unified monitoring view
  - Test data injection for dashboard development
IoT Data Aggregation (Complete Solution)
Multi-Source Monitoring:
  - Collect from Modbus devices via polling (Client mode)
  - Receive external data via MQTT subscriptions (Data Reception)
  - Display unified view in Monitor Points grid
  - Publish combined analytics to cloud (Publisher)
  - Independent operation of each data source
Development & Testing (Integrated Tools)
Development Workflow:
  1. Use MQTT publishers to inject test data into Monitor Points
  2. Test monitoring dashboards with simulated data
  3. Verify data processing with integrated MQTT client
  4. Deploy same XPF configuration to production with real Modbus devices
No Other Tool Does This
XPF eliminates the complexity of:
- Learning multiple MQTT client applications
- Integrating separate publisher/subscriber tools
- Writing custom code to bridge Modbus and MQTT
- Managing multiple software licenses and configurations
- Debugging communication between separate tools
This guide will show you how to leverage both directions plus the integrated test tools for complete MQTT solutions.
Quick Start: Connect to Public MQTT Brokers
The fastest way to get started with MQTT is to connect to free public test brokers. This section shows how to configure XPF to connect to popular public MQTT brokers for testing and development.
Supported Public Brokers
Recommended for beginners - reliable and well-maintained
| Connection Type | Host | Port | Security | Notes |
|---|---|---|---|---|
| TCP | broker.hivemq.com |
1883 |
Unencrypted | Basic testing |
| TCP + TLS | broker.hivemq.com |
8883 |
Encrypted | Recommended for production testing |
| WebSocket | broker.hivemq.com |
8000 |
Unencrypted | Web browser compatible |
| WebSocket + TLS | broker.hivemq.com |
8884 |
Encrypted | Secure web browser compatible |
Authentication: None required (anonymous access)
Reliability: High uptime, actively maintained by HiveMQ
Best For: Learning MQTT, initial testing, proof of concepts
Alternative option for testing
| Connection Type | Host | Port | Security | Notes |
|---|---|---|---|---|
| TCP | test.mosquitto.org |
1883 |
Unencrypted | Basic testing |
| TCP + TLS | test.mosquitto.org |
8883 |
Encrypted | Secure testing |
Authentication: None required (anonymous access)
Reliability: Good uptime, community maintained
Best For: Alternative testing option, Mosquitto-specific features
Additional testing option
| Connection Type | Host | Port | Security | Notes |
|---|---|---|---|---|
| TCP | broker.emqx.io |
1883 |
Unencrypted | Basic testing |
| TCP + TLS | broker.emqx.io |
8883 |
Encrypted | Secure testing |
| WebSocket | broker.emqx.io |
8083 |
Unencrypted | Web browser compatible |
| WebSocket + TLS | broker.emqx.io |
8084 |
Encrypted | Secure web browser compatible |
Authentication: None required (anonymous access)
Reliability: Good uptime, EMQX maintained
Best For: Testing EMQX-specific features, alternative broker option
Run your own broker locally
| Connection Type | Host | Port | Security | Setup Required |
|---|---|---|---|---|
| TCP | localhost |
1883 |
Unencrypted | Install Mosquitto locally |
| TCP + TLS | localhost |
8883 |
Encrypted | Configure TLS certificates |
Authentication: Configurable (can require username/password)
Reliability: Depends on your setup
Best For: Development, learning broker administration, offline testing
Quick Setup:
Public Broker Security
Public brokers are intended for testing only. Never send sensitive data or use them for production applications. Anyone can subscribe to your topics and see your messages.
🚀 Quick Setup Tutorial
This complete tutorial walks you through connecting XPF to an MQTT broker and verifying the connection. We'll use HiveMQ's public broker (broker.hivemq.com) since it requires no registration and is perfect for learning.
Example Configuration Notice
The following steps demonstrate connecting to broker.hivemq.com as an example. You can substitute any broker from the Supported Public Brokers tabs above, or use your own private broker by replacing the host, port, and authentication details as needed.
Quick Navigation
Choose your path:
- 🔧 Part A: Configure XPF - Set up XPF MQTT connection
- 🔍 Part B: Set up Verification Tool - Configure MQTT Explorer for testing
- ✅ Part C: Test & Verify - Publish test data and verify
Prerequisites
- Modbus Monitor XPF with MQTT Add-on installed and licensed
- Internet connection for accessing public brokers
- Basic understanding of MQTT topics and messages
Part A: Configure XPF MQTT Connection
Configure XPF to connect to the MQTT broker:
- Open MQTT Configuration
- Launch Modbus Monitor XPF
- Navigate to the MQTT Add-on settings
-
Example: We'll connect to
broker.hivemq.comon port1883 -
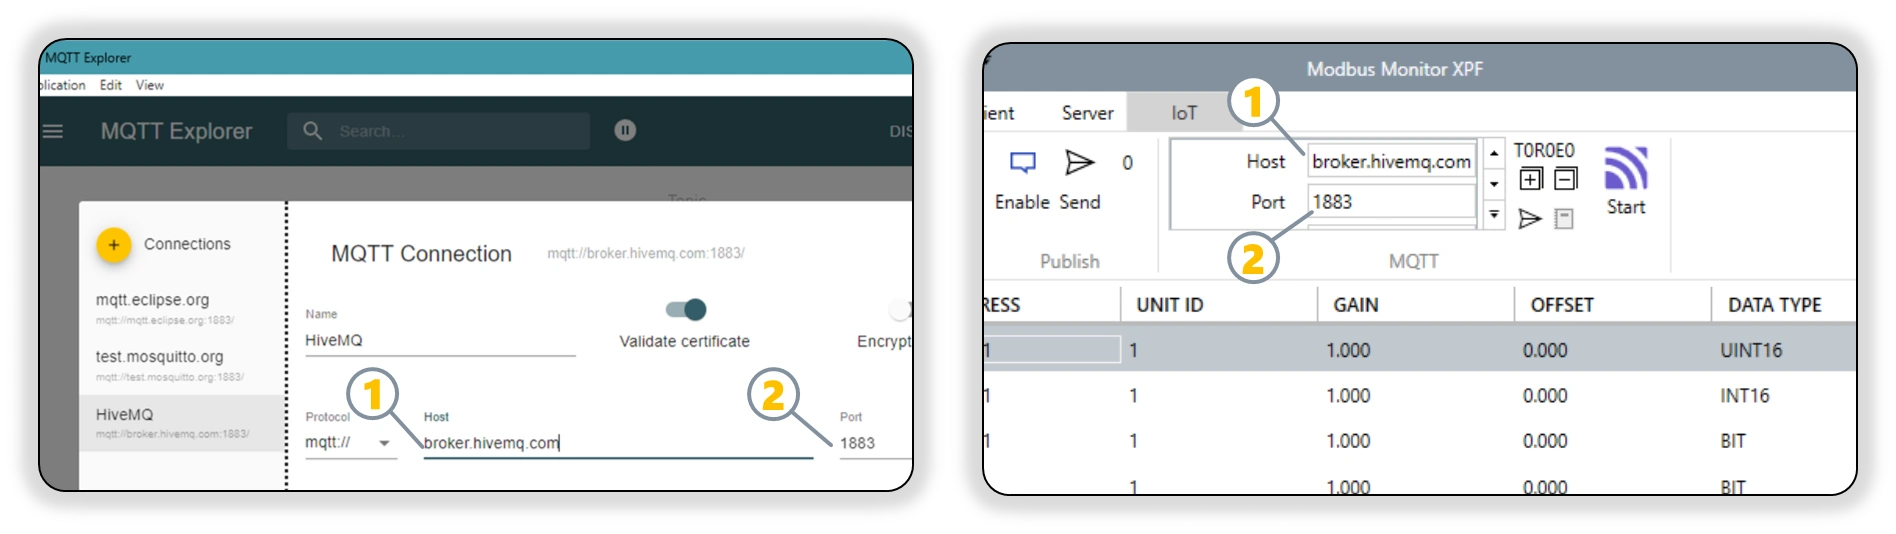
Enter Broker Details
- Broker Address: Enter
broker.hivemq.com - Port: Use
1883for unencrypted or8883for TLS - Protocol: Select
TCPorTLS TCPbased on your port choice - Client ID: Enter a unique identifier (e.g.,
XPF-Test-001)
- Broker Address: Enter
-
Authentication Settings
- Username: Leave blank (public broker requires no authentication)
- Password: Leave blank
- Certificate: Not required for basic connection
-
Test Connection
- Click "Test Connection" to verify connectivity
- Should show "Connected" status if successful
-
Configure Topics
- Publish Topic:
xpf/test/data(example) - Publish Topic:
xpf/(used in Example below) - Subscribe Topic:
xpf/test/commands(example)
- Publish Topic:
Topic Best Practices
Use unique topic prefixes to avoid conflicts with other users:
- Good: yourname/xpf/device1/data
- Avoid: data or test (too generic)
Part B: Set up MQTT Explorer for Verification
Set up MQTT Explorer to monitor and verify your MQTT messages:
To verify that your XPF MQTT connection is working correctly, use MQTT Explorer - a free desktop application that provides a visual interface for monitoring MQTT traffic.
Step 1: Download and Install MQTT Explorer
- Download and Install MQTT Explorer
- Visit: MQTT Explorer Official Site
- Download the installer for Windows
- Install and launch the application
Step 2: Configure MQTT Explorer Connection
- Configure MQTT Explorer Connection and Subscriptions
- Name:
HiveMQ Public Test(or any descriptive name) - Host:
broker.hivemq.com - Port:
1883 - Protocol:
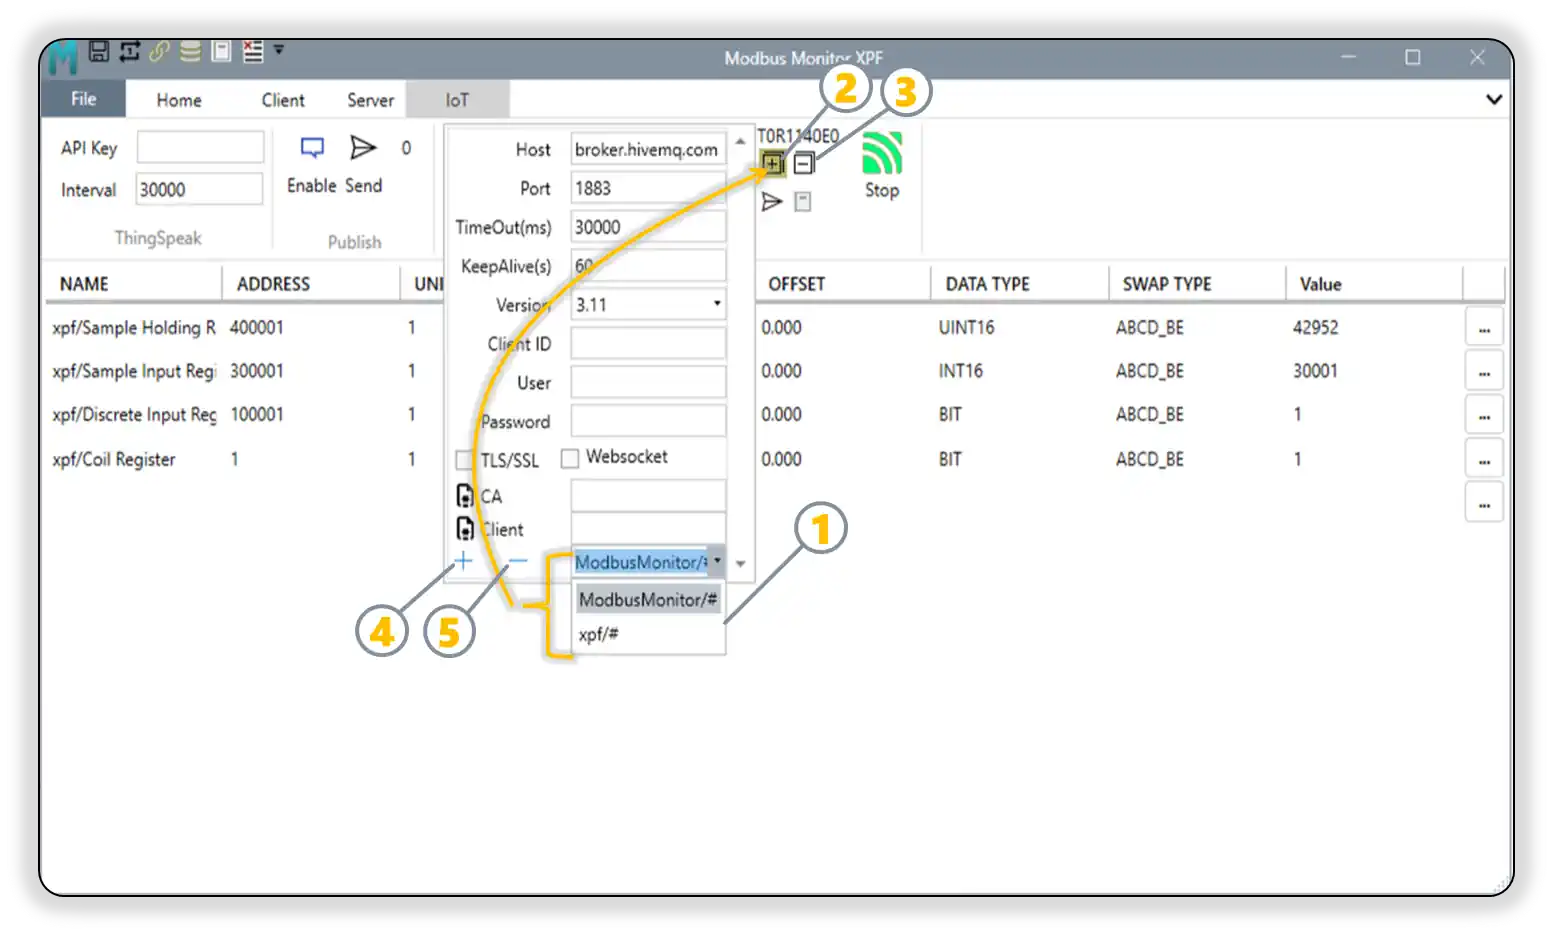
mqtt:// - Important: Set up subscriptions BEFORE connecting (MQTT Explorer requirement):
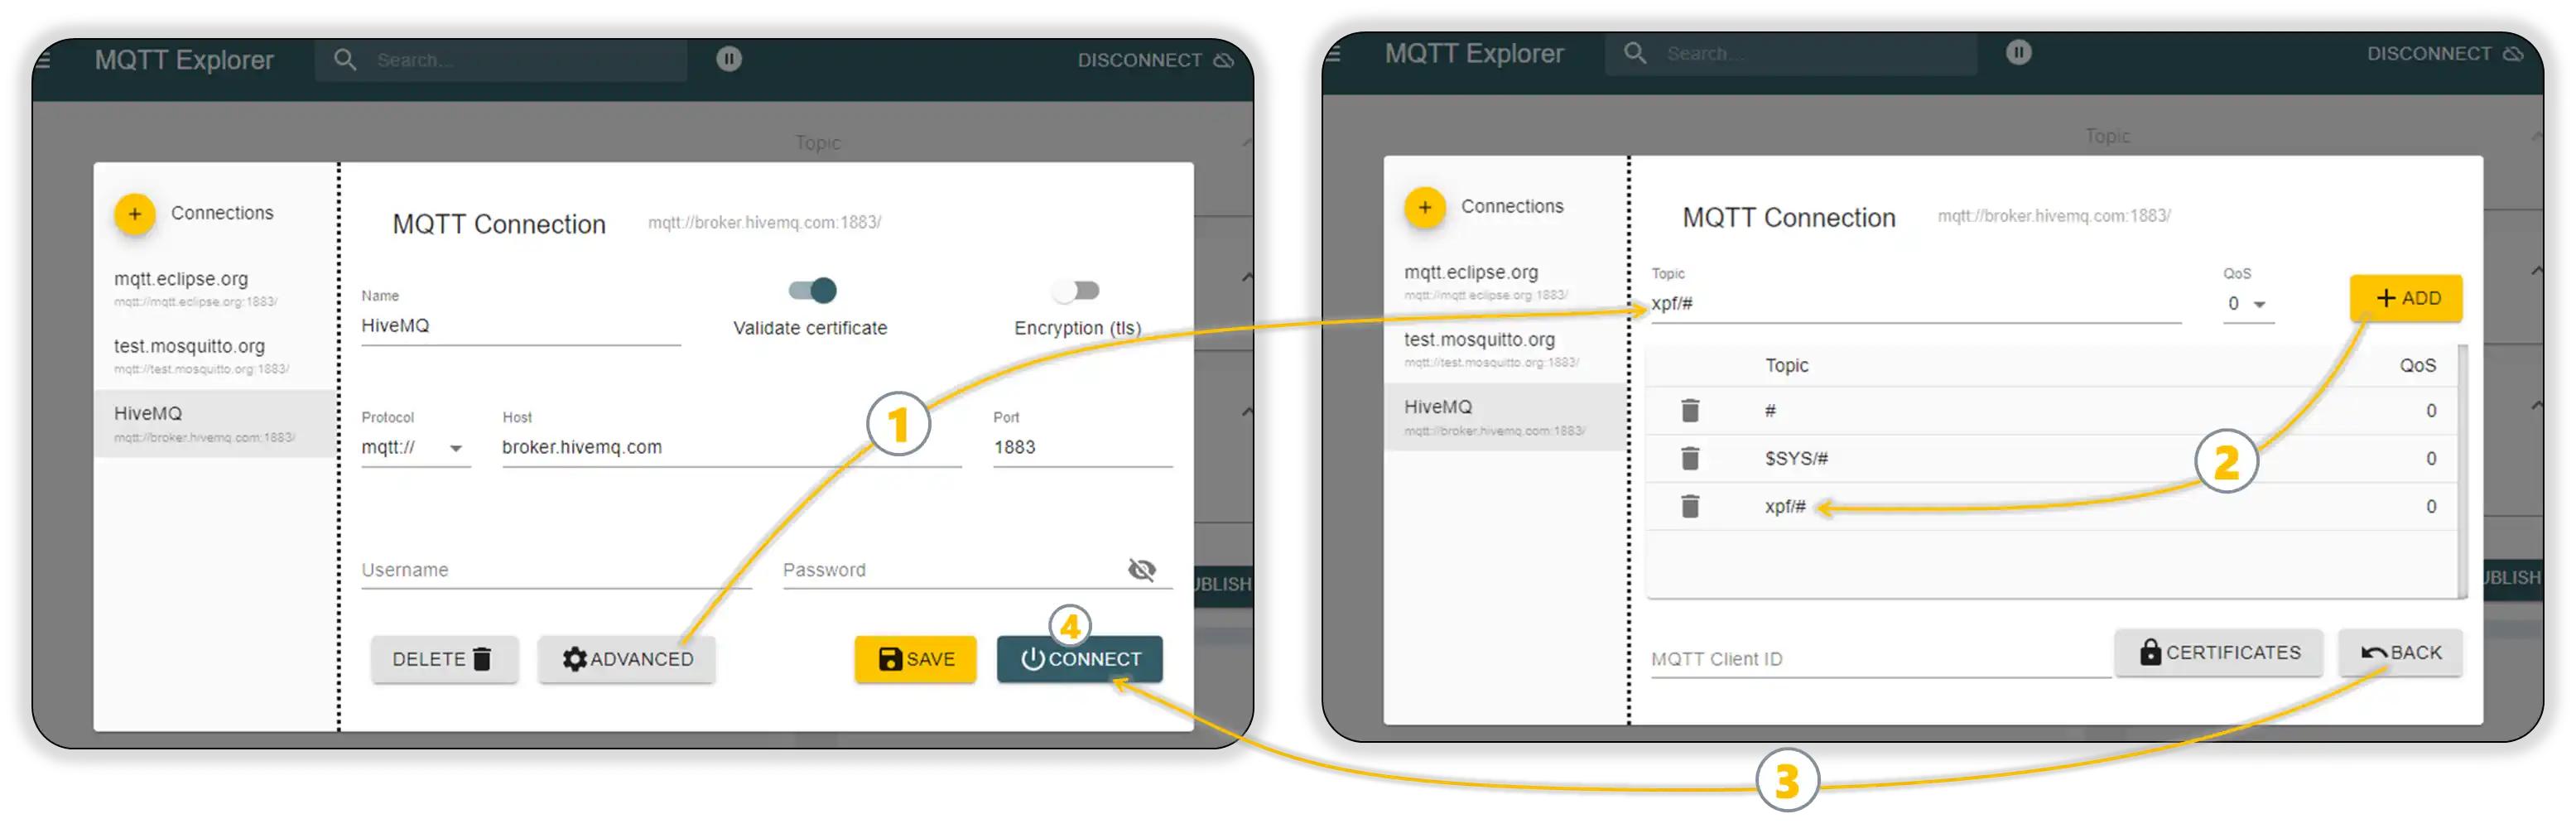
- Expand the Advanced section in the connection dialog,
1 - In the Topic field, enter:
xpf/# - Click the + ADD button to add the subscription
2 - The
#wildcard will capture all messages starting withxpf/ - Click Back button,
3
- Expand the Advanced section in the connection dialog,
- Click "Connect",
4 - MQTT Explorer shows Connected status
- Name:
Step 3: Verify MQTT Explorer Setup
- Verify Subscription Setup
- MQTT Explorer should show the
xpf/#topic in the subscription list - This will monitor all messages from your XPF configuration
- Leave MQTT Explorer running to capture incoming messages
- Position windows so you can see both XPF and MQTT Explorer
- MQTT Explorer should show the
MQTT Client Subscription Behavior
Different MQTT client applications handle subscriptions differently:
- MQTT Explorer: Requires topic subscriptions in the Advanced section BEFORE connecting
- Other MQTT clients: May allow subscriptions after connecting (varies by software)
Always check your specific MQTT client's requirements. Our examples use MQTT Explorer, which needs pre-connection setup. See Step 2: Configure Topics for detailed XPF topic configuration.
Part C: Test and Verify Connection
Configure XPF monitor points and test the complete MQTT flow:
Step 1: Configure XPF Monitor Points for MQTT
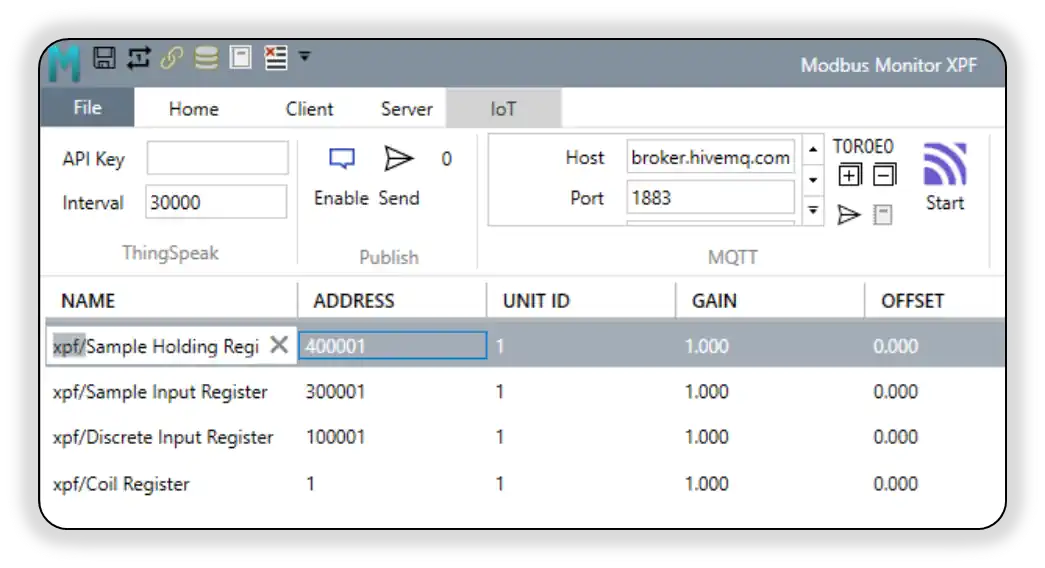
- Configure Monitor Points for MQTT Publishing
- In XPF, locate the monitor points you want to publish to MQTT
- In the Name field for each monitor point, enter the MQTT topic name that matches what you configured in MQTT Explorer
- Example: If you subscribed to
xpf/#in MQTT Explorer, name your monitor points like:xpf/Sample Holding Registerxpf/Sample Input Registerxpf/Discrete Input Registerxpf/Coil Register- This ensures the published MQTT messages appear under the correct topic tree in MQTT Explorer
Step 2: Enable Communication Logging
- Enable Communication Logging to see detailed MQTT activity
- General Communication Log: In XPF, go to Home Tab > Log > Show and click Start
- MQTT-Specific Debug Log: Go to IoT Tab > MQTT Group > Debug Log Button and click Start
- The MQTT Debug Log provides detailed connection, authentication, and message flow information specifically for MQTT operations
- For detailed logging setup: See Communication Logging in the XPF User Guide
Step 3: Start MQTT Communication
- Start MQTT Communication
- Click the Start button in IoT Tab > MQTT Group > Start
- Verify connection success by checking:
- XPF displays "Connected" status
- MQTT icon changes to green (connected state)
- Watch the Communication Log for MQTT connection messages:
Step 4: Publish Sample Data to MQTT Broker
-
Use XPF's Test/Sample Publishing Feature
- In XPF MQTT interface, locate the Send Sample or Test Publish button
- Click the button to publish all configured monitor points as sample data
- This sends a one-time test message for each monitor point to verify connectivity
- Watch MQTT Explorer to confirm messages are received in real-time
-
Verify Test Message Flow
- Check that MQTT Explorer receives the test messages immediately
- Confirm message format, content, and values match your monitor points
- Communication Log should show published test messages with timestamps:
text 03:33:13:289810,xpf/Sample Holding Register : 40001 03:33:13:290089,xpf/Sample Input Register : 30001 03:33:13:290243,xpf/Discrete Input Register : 1 03:33:13:290382,xpf/Coil Register : 1 - Stop the Communication Logging and close the Log window after successful test verification

Step 5: Enable Continuous Publishing (Client Mode)
- Enable Automatic Message Publishing
- Click Start from the Client Tab to automatically publish these topics on every iteration when the full monitor point list is polled
- XPF begins continuous publishing of monitor point data to MQTT topics
- In MQTT Explorer, verify messages appear consistently in real-time under your topic tree
- Monitor message content, timestamps, and publishing frequency to ensure proper operation
- Communication Log shows detailed publish confirmation for ongoing operations
🎉 Tutorial Complete! Validation Checklist
Your MQTT connection is working correctly when:
- ✅ MQTT Explorer shows "Connected" status
- ✅ Test messages from XPF appear in MQTT Explorer immediately
- ✅ Message content matches your monitor point values
- ✅ Message timestamps are current
- ✅ Communication Log shows successful publish confirmations
Next Steps: Advanced Configuration
Now that you have basic MQTT communication working, you can explore advanced features:
- 🔐 Secure Setup Guide - TLS/SSL encryption, WebSocket, and certificate authentication
- 📡 MQTT Data Reception Guide - Receive MQTT data and update monitor points in real-time
- 🏭 Advanced Configuration - Custom topic structures and message formatting
- 🛠️ Production Examples - Real-world configuration examples with detailed steps
Secure Setup Guide
Once you've completed the Quick Setup Tutorial, you can implement secure connections for production environments.
TLS/SSL Encrypted Connections
For production systems, always use encrypted MQTT connections to protect your data.
Option 1: HiveMQ Cloud (Recommended for Beginners)
Quick secure setup with managed cloud broker:
- Create Free HiveMQ Cloud Account
- Visit HiveMQ Cloud
- Create cluster (2-3 minutes)
- Note cluster URL:
your-cluster.s2.eu.hivemq.cloud
-
Configure XPF for TLS
-
Test Secure Connection
- XPF shows "Connected (TLS)" status
- Use HiveMQ WebSocket client in dashboard for verification
-
Enable MQTT Debug Log (IoT Tab > MQTT Group > Debug Log) to see detailed connection status:
text
     11/8/2025 3:34:33 PM,MQTT Start/Stop Toggle
     11/8/2025 3:34:33 PM,Port 8883 on a88b7e2966be46fdaa86a088d60d4160.s1.eu.hivemq.cloud is open.
     11/8/2025 3:34:33 PM,Connecting...
     11/8/2025 3:34:33 PM,TCP Server: a88b7e2966be46fdaa86a088d60d4160.s1.eu.hivemq.cloud:8883
     11/8/2025 3:34:33 PM,Using credentials. Username: hivemq.webclient.1762555561933 Password:***
     11/8/2025 3:34:33 PM,TLS encryption enabled. Using protocol: Tls12
     11/8/2025 3:34:33 PM,No CA certificate provided.
     11/8/2025 3:34:33 PM,No client certificate provided.
     11/8/2025 3:34:33 PM,Using credentials. Username: hivemq.webclient.1762555561933 Password:***
     11/8/2025 3:34:33 PM,MQTT Client Configuration>> Host:a88b7e2966be46fdaa86a088d60d4160.s1.eu.hivemq.cloud, Port:8883, Protocol:3.11, Timeout:10000, KeepAlive:60s WebSocket:False, TLS:True, CA Cert Path:, Client Cert Path:, Username:hivemq.webclient.1762555561933, Password:***
     11/8/2025 3:34:33 PM,Connecting...
     11/8/2025 3:34:34 PM,Certificate validation approved. Errors: None. Subject: CN=*.s1.eu.hivemq.cloud. Thumbprint: A5ACACC3389D15FFAE7E2004F166320558B381CF. Chain elements: 3
     11/8/2025 3:34:34 PM,Connected.
     11/8/2025 3:34:34 PM,Connected to MQTT Broker
     11/8/2025 3:34:44 PM,Published: xpf/Sample Holding Register 40001
     11/8/2025 3:34:44 PM,xpf/Sample Holding Register : 40001
     11/8/2025 3:34:44 PM,Published: xpf/Sample Input Register 30001
     11/8/2025 3:34:44 PM,xpf/Sample Input Register : 30001
     11/8/2025 3:34:44 PM,Published: xpf/Discrete Input Register 1
     11/8/2025 3:34:44 PM,xpf/Discrete Input Register : 1
     11/8/2025 3:34:44 PM,Published: xpf/Coil Register 1
     11/8/2025 3:34:44 PM,xpf/Coil Register : 1
Option 2: Public Broker with TLS
Use public brokers with encryption:
- Configure TLS Connection
WebSocket Connections
For firewall-friendly connections or web-based integration:
Standard WebSocket (Testing Only)
Broker Host: broker.hivemq.com
Port: 8000 (WebSocket)
Protocol: ws://
TLS/SSL: ✗ Disabled
Websocket: ✓ Enabled
Secure WebSocket (Production)
Broker Host: broker.hivemq.com
Port: 8884 (WebSocket + TLS)
Protocol: wss://
TLS/SSL: ✓ Enabled
Websocket: ✓ Enabled
Certificate-Based Authentication
Understanding Certificate Authentication
Certificate authentication provides enhanced security for MQTT connections through cryptographic validation. There are two types of certificates used in MQTT security:
1. CA (Certificate Authority) Certificate
- Purpose: Validates the broker's identity (server authentication)
- When to use: When connecting to brokers with custom/private certificates
- Security benefit: Prevents man-in-the-middle attacks by verifying broker authenticity
2. Client Certificate
- Purpose: Authenticates your device to the broker (client authentication)
- When to use: When broker requires mutual TLS (mTLS) authentication
- Security benefit: Ensures only authorized devices can connect
When to Use Certificates
| Scenario | CA Certificate | Client Certificate | Use Case |
|---|---|---|---|
| Public brokers (HiveMQ, EMQX public) | Optional (auto-detect) | Not supported | Basic testing, learning |
| Private cloud brokers (EMQX Cloud, HiveMQ Cloud) | Required (download from provider) | Optional | Secure production deployment |
| Enterprise environments | Required (from IT department) | Required | High-security, compliance requirements |
| Self-hosted brokers | Required (your own CA) | Required | Complete control and security |
EMQX Cloud Certificate Configuration
EMQX provides downloadable CA certificates for secure connections - making it an excellent example for demonstrating explicit certificate configuration:
Why EMQX for CA Certificate Example
EMQX Cloud offers free CA certificate downloads with clear visibility of expiration dates, making it perfect for learning certificate management:
- HiveMQ Cloud: Uses auto-detect certificates (easier but less transparent)
- EMQX Cloud: Provides downloadable CA certificates (explicit trust chain)
- Learning benefit: Shows proper certificate management workflow
- Production ready: Same approach used in enterprise environments
EMQX provides downloadable CA certificates for secure connections:
-
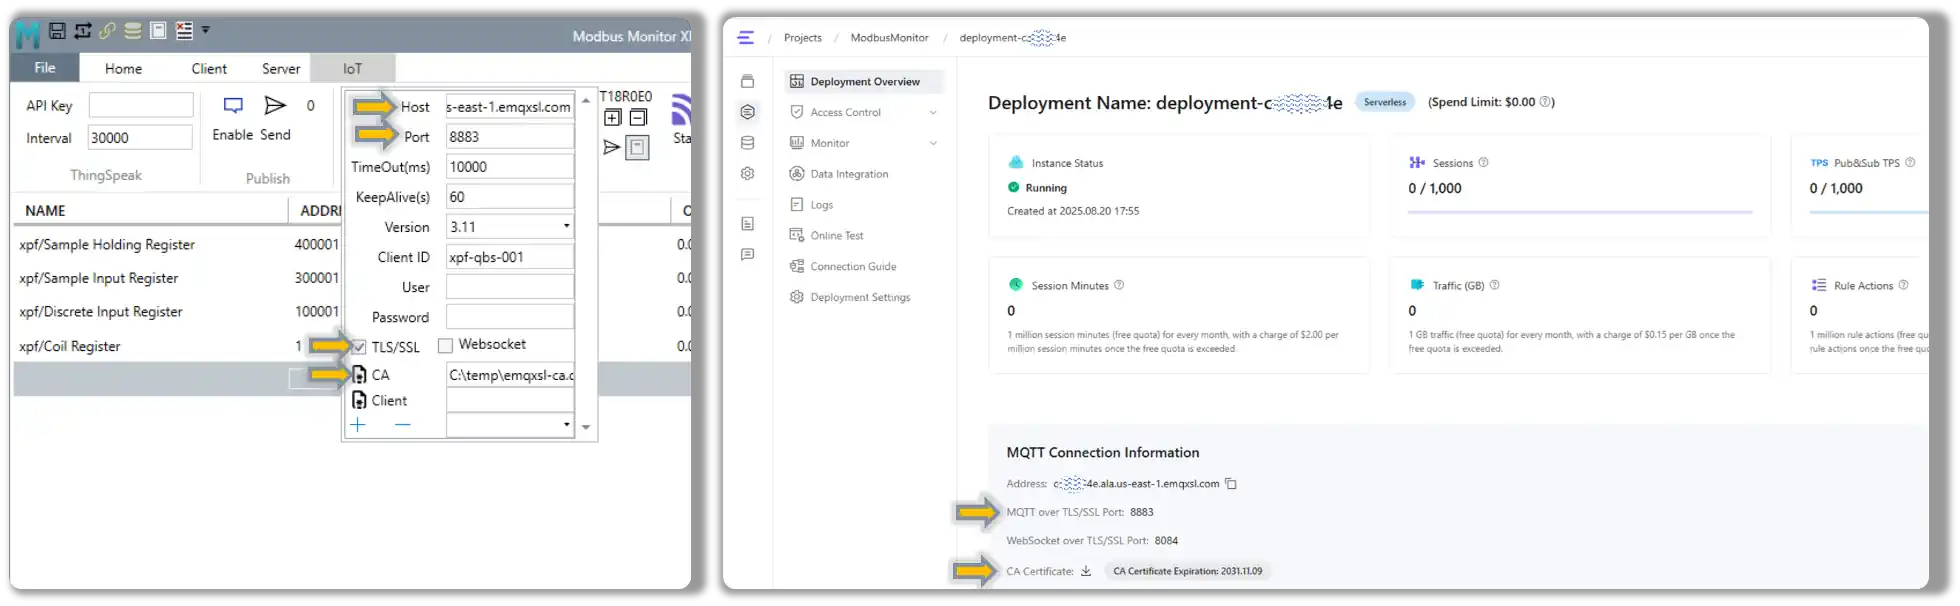
Download CA Certificate from EMQX Console
- Log into your EMQX deployment console (as shown in screenshot)
- Navigate to Deployment Overview → MQTT Connection Information
- Click CA Certificate download link (shows "CA Certificate Expiration: 2031.11.09")
- Save the certificate file (usually named
ca.crtor similar)
-
Configure XPF with EMQX CA Certificate
-
Set CA Certificate Path in XPF
- In XPF MQTT settings, locate the CA Certificate button (file icon)
- Click the CA Certificate button to open file browser
- Navigate to your downloaded CA certificate file
- Select the certificate file (e.g.,
ca.crt,emqx-ca.pem) - XPF will display the certificate path in the field
Client Certificate Authentication
For high-security environments requiring mutual authentication:
Advanced Setup
Client certificates require PKI knowledge and certificate management. Only recommended for enterprise environments with proper certificate infrastructure.
When Client Certificates Are Required
Industrial & Enterprise Scenarios:
- Manufacturing Plants: PLCs and SCADA systems requiring device authentication
- Critical Infrastructure: Power plants, water treatment, transportation systems
- Compliance Environments: ISO 27001, IEC 62443, SOX, HIPAA requirements
- Zero-Trust Networks: All devices must be cryptographically authenticated
- Multi-Tenant Brokers: Shared MQTT infrastructure requiring device isolation
Security Benefits:
- Device Identity Verification: Each device has unique cryptographic identity
- Non-Repudiation: Cryptographic proof of device actions and commands
- Access Control: Fine-grained permissions based on certificate attributes
- Audit Trails: Complete logging of authenticated device communications
Typical Implementation:
Enterprise Setup:
  CA Certificate: Company's root certificate authority
  Client Certificate: Device-specific certificate signed by company CA
  Broker Configuration: Requires both server and client authentication
  Access Control: MQTT topics mapped to certificate attributes
Generate Client Certificate (optional)
# Create private key and certificate
openssl genpkey -algorithm RSA -out client-key.pem
openssl req -new -key client-key.pem -out client.csr
openssl x509 -req -in client.csr -signkey client-key.pem -out client-cert.pem

# Convert to PFX for XPF
openssl pkcs12 -export -out client.pfx -inkey client-key.pem -in client-cert.pem
Configure XPF with Certificates
XPF Certificate Configuration Steps:
-
Open XPF MQTT Settings
- Navigate to IoT Tab > MQTT Group > Settings
- Enable TLS/SSL checkbox first
-
Set CA Certificate Path
- Click the CA Certificate button (file certificate icon)
- Browse to your downloaded CA certificate file
- Select the certificate file (e.g.,
ca.crt,emqx-ca.pem,your-company-ca.crt) - XPF displays the full path in the field
-
Set Client Certificate Path (if required)
- Click the Client Certificate button (file certificate icon)
- Browse to your client certificate file (must be in PFX format)
- Select the certificate file (e.g.,
client.pfx,device-cert.pfx) - Enter the certificate password when prompted
-
Complete Configuration
Broker Configuration:
  Broker Host: secure-broker.yourcompany.com (or EMQX endpoint)
  Port: 8883 (TLS port)
  Client ID: XPF-Device-001 (must match certificate CN if using client certs)
  TLS/SSL: ✓ Enabled

Certificate Configuration:
  CA Certificate: [Full path displayed after browsing]
  Client Certificate: [Full path displayed after browsing, PFX format]
  Certificate Password: [Entered during PFX selection]
Certificate File Format Requirements:
- CA Certificate: .crt, .pem, .cer formats supported
- Client Certificate: Must be .pfx (PKCS#12) format containing both certificate and private key
- Certificate Path: XPF stores and displays the full file path after selection
Certificate Management in XPF
XPF Certificate UI Features:
- File Browser Integration: Certificate buttons open standard file dialogs
- Path Validation: XPF validates certificate file format and accessibility
- Secure Storage: Certificate paths stored in XPF configuration (passwords not stored)
- Certificate Icons: File certificate icons clearly identify certificate configuration buttons
Authentication vs Authorization
Understanding the difference between authentication (who you are) and authorization (what you can do) is crucial for proper MQTT security implementation.
Authentication: "Who Are You?"
Authentication Methods by Complexity:
| Method | Security Level | Use Case | Username Required | Notes |
|---|---|---|---|---|
| Anonymous | None | Public testing only | No | Anyone can connect |
| Username/Password | Basic | Development, cloud services | Yes | Simple credential-based auth |
| CA Certificate Only | Medium | Verified server identity | Yes (usually) | Validates broker, not client |
| Client Certificate | High | Enterprise environments | No* | Cryptographic device identity |
| Client Cert + Username | Highest | Maximum security | Yes | Both crypto and credential auth |
*Client certificates can replace username/password but may be used together for defense in depth.
Authorization: "What Can You Do?"
After authentication, authorization controls access to topics and operations:
HiveMQ Cloud Authorization Example:
Topic Permissions (configured in broker):
  User "sensor-device":
    - CAN publish to: "sensors/+/data"
    - CANNOT publish to: "commands/#"
    - CAN subscribe to: "sensors/sensor-001/config"

  User "control-dashboard":
    - CAN publish to: "commands/#"
    - CAN subscribe to: "sensors/+/data"
    - CAN subscribe to: "alarms/#"
Recommended Configurations by Use Case
Goal: Get started quickly with minimal complexity
Authentication: Username/Password
XPF Configuration:
  TLS/SSL: ✓ Enabled (use 8883)
  CA Certificate: Auto-detect
  Username: your-hivemq-username
  Password: your-hivemq-password
  Client Certificate: (leave empty)
Authorization: Default permissions (can publish/subscribe to all topics)
Benefits: - Quick setup, no certificate management - Encrypted connection protects data in transit - Good for learning and development
Limitations: - Relies on shared credentials - Less secure than certificate-based auth
Goal: Production-ready security with manageable complexity
Authentication: Username/Password + Downloaded CA Certificate
XPF Configuration:
  TLS/SSL: ✓ Enabled
  CA Certificate: [Downloaded from EMQX/HiveMQ console]
  Username: production-device-001
  Password: strong-unique-password
  Client Certificate: (leave empty)
Authorization: Topic-based permissions
Broker Configuration:
  Device Permissions:
    - PUBLISH: "factory/line1/data/#"
    - SUBSCRIBE: "factory/line1/commands/+"
    - DENY: "admin/#", "system/#"
Benefits: - Explicit trust chain (no auto-detect) - Topic-level access control - Credential rotation capabilities
When to use: - Production deployments - Multi-device installations - Customer-facing systems
Goal: Highest security for critical infrastructure
Authentication: Client Certificate + CA Certificate (mutual TLS)
XPF Configuration:
  TLS/SSL: ✓ Enabled
  CA Certificate: company-root-ca.crt
  Client Certificate: device-001.pfx
  Certificate Password: strong-pfx-password
  Username: (optional - can be derived from certificate)
Authorization: Certificate-based permissions + topic ACLs
Broker Configuration:
  Certificate Subject: CN=XPF-Plant1-Device001
  Permitted Actions:
    - PUBLISH: "plant1/devices/001/#"
    - SUBSCRIBE: "plant1/commands/001/+"
    - DENY ALL other topics
Benefits:
- Cryptographic device identity
- No shared credentials
- Granular certificate-based permissions
- Audit trails for all device actions
When to use:
- Critical infrastructure
- Compliance environments (IEC 62443, ISO 27001)
- Zero-trust networks
- High-value industrial systems
Implementation Recommendations
Start Simple, Scale Security:
- Development Phase: Begin with username/password + TLS
- Testing Phase: Add downloaded CA certificates
- Production Phase: Implement topic-based authorization
- Enterprise Phase: Add client certificates for device authentication
Common Security Progression:
Phase 1: Anonymous → Username/Password + TLS
Phase 2: Add CA Certificate (explicit trust)
Phase 3: Configure topic permissions (authorization)
Phase 4: Client certificates (device identity)
Authentication vs Authorization Gotcha
Client certificates replace username/password for authentication but broker authorization policies still determine topic access. A device with a valid certificate can still be denied access to specific topics by authorization rules.
HiveMQ vs EMQX Authorization
- HiveMQ Cloud: Authorization configured in web console under "Access Management"
- EMQX Cloud: Authorization rules configured in "Authentication & Authorization" section
- Both support: Topic-based ACLs, username-based rules, certificate-based policies
Verification
Secure connection indicators:
- XPF status shows "Connected (TLS)" or "Connected (WSS)"
- Communication log shows no certificate errors
- Message traffic encrypted (use Wireshark to verify)
Production Ready
Your MQTT connection is now production-ready with:
- ✅ Encrypted data transmission
- ✅ Server authentication
- ✅ Optional client authentication
- ✅ Firewall-friendly options
For detailed configuration steps, see: Complete Setup Examples section.
MQTT Data Reception Guide: Real-Time Monitor Point Updates
XPF's MQTT subscription feature allows receiving data from MQTT brokers and updating monitor points in real-time - enabling remote data injection and external system integration. This powerful feature works independently of Modbus Client/Server operations, allowing you to receive data via MQTT and display it in XPF's monitor points grid regardless of whether you're actively polling Modbus devices or running a Modbus server.
Interface Elements:
| Element | Control | Function | Status Indicator |
|---|---|---|---|
| 1 | Subscription Topics List | View and manage active MQTT topic subscriptions | Displays all topics currently subscribed for incoming messages |
| 2 | [+] Subscribe to All Topics | Subscribes to all topics in the current list | Highlighted when MQTT broker confirms successful subscription |
| 3 | [-] Unsubscribe from All Topics | Removes subscription from all topics in the list | Highlighted when broker confirms unsubscription status |
| 4 | + Add Topic | Add new topic after typing in text box | Use for patterns like sensors/+/data, commands/# |
| 5 | - Remove Topic | Select topic from list and click to remove | Removes topic from subscription configuration |
MQTT Communication Statistics
XPF provides real-time MQTT communication statistics displayed in the T00R00E00 format in the MQTT interface:
Statistics Format: TxxRxxExx - T (Transmit): Number of messages successfully published to the MQTT broker - R (Receive): Number of messages successfully received from subscribed topics - E (Error): Number of communication errors encountered (connection failures, publish errors, receive errors)
Example Statistics Display: - T125R089E003 = 125 messages sent, 89 messages received, 3 errors - T000R000E000 = No activity yet (initial state) - T045R000E001 = 45 messages published, no messages received, 1 error occurred
Statistics Updates: - Real-time counting: Counters update immediately as MQTT operations occur - Persistent during session: Counters accumulate throughout the XPF session - Reset capability: Use "Reset Counters" button to clear all statistics - Independent tracking: Publish/subscribe counters work independently of each other
Understanding MQTT Traffic Patterns
Normal operation patterns: - Publishing only: High T count, R=000 (XPF sending data to broker) - Subscribing only: T=000, high R count (XPF receiving external data) - Bidirectional: Both T and R counters increasing (full MQTT integration) - Error monitoring: E count should remain low; investigate if errors increase rapidly
How MQTT Data Reception Works:
- Configure subscription topics in XPF's MQTT panel to listen for incoming messages
- When MQTT messages arrive, XPF automatically updates the Monitor Points data grid with the new values
- Works independently: No need to start Modbus Client or Server tabs - MQTT data updates happen automatically
- Supports both structured JSON data and simple topic/payload formats for maximum flexibility
- Automatically creates new monitor points or updates existing ones based on incoming MQTT data
Key Independence Feature:
- Monitor Points Grid Updates: MQTT messages directly update the visual data grid in real-time
- No Modbus Dependency: Works whether Modbus Client/Server tabs are running or stopped
- Real-Time Display: See external data flowing into XPF immediately as MQTT messages arrive
- Flexible Data Sources: Combine Modbus polling with MQTT data injection in the same monitor points view
Practical Applications:
- External Data Integration: Receive sensor data from IoT devices, weather stations, or cloud services via MQTT
- Multi-Protocol Monitoring: Combine Modbus device data with MQTT data sources in a single view
- Remote Data Injection: Accept data from external systems (databases, APIs, other applications) via MQTT
- Development & Testing: Simulate device data by publishing MQTT messages that appear in monitor points
- Dashboard Data Sources: Use MQTT to feed external data into XPF for unified monitoring displays
Multi-Source Monitoring Setup
Perfect for comprehensive monitoring: Configure some monitor points to poll Modbus devices while subscribing to MQTT topics for external data. All data appears together in the same monitor points grid, providing a unified view of your entire system.
Bidirectional MQTT Capabilities
Publishing (Outbound): XPF polls Modbus → publishes data to MQTT broker (covered in previous sections)
Subscribing (Inbound): XPF receives MQTT messages → updates Monitor Points grid → displays real-time data from any MQTT source
Supported Message Formats:
- Complete JSON DTO Format: Full register details with all Modbus configuration parameters
- Simple Topic/Payload: Topic name becomes monitor point name, payload becomes the value
- Automatic Point Management: Creates new monitor points or updates existing ones based on address, unit ID, and register type matching
Complete JSON DTO Format (Published by XPF when Modbus Client is running):
{
  "RegName": "ModbusMonitor/Signed",
  "RegAddress": 400001,
  "RegUnitID": 1,
  "RegGain": 1,
  "RegOffset": 0,
  "RegType": "UINT16",
  "RegByteSwap": "ABCD_BE",
  "RegValue": "204",
  "OneBased": false,
  "HasError": false
}
JSON DTO Field Descriptions:
- RegName: Monitor point display name
- RegAddress: Modbus register address
- RegUnitID: Modbus device unit/slave ID
- RegGain: Scaling gain factor applied to raw value
- RegOffset: Scaling offset applied to raw value
- RegType: Modbus register type (UINT16, SINT16, UINT32, etc.)
- RegByteSwap: Byte order configuration (ABCD_BE, DCBA_LE, etc.)
- RegValue: Current processed value (after gain/offset scaling)
- OneBased: Address format (true=1-based, false=0-based addressing)
- HasError: Error status (true if communication/processing error occurred)
MQTT Subscription Setup
Step 1: Configure MQTT Subscription Topics
- Open MQTT Panel in XPF
- Navigate to the MQTT Add-on panel in XPF
- Locate the Subscription Topics list/configuration area
-
Important: Ensure MQTT broker connection is configured and working (see previous sections)
-
Add Subscription Topics
Example Subscription Topics:
  - "sensors/temperature/+" - Temperature data from multiple sensors
  - "external/weather/data" - Weather service data
  - "system/alarms/#" - System alarm messages
  - "devices/+/status" - Device status updates

Message Processing:
  - JSON DTO format: Full register details in structured format
  - Simple format: Topic name → Monitor Point name, Payload → Value
  - Automatic point creation: New monitor points added if not existing
Step 2: Message Format Options
Option A: Complete JSON DTO Format (Published by XPF)
Topic: "sensors/temperature/room1"
Message: {
  "RegName": "Room1 Temperature",
  "RegAddress": 40001,
  "RegUnitID": 1,
  "RegGain": 0.1,
  "RegOffset": -273.15,
  "RegType": "SINT16",
  "RegByteSwap": "ABCD_BE",
  "RegValue": "23.5",
  "OneBased": false,
  "HasError": false
}
Result: Creates/updates monitor point with complete register configuration and scaling
Option B: Simplified JSON Format (For External Publishers)
Topic: "sensors/temperature/room1"
Message: {
  "RegName": "Room1 Temperature",
  "RegValue": "23.5",
  "RegAddress": "40001",
  "RegType": "Holding Register",
  "RegUnitID": "1"
}
Result: Creates/updates monitor point with basic register details
Option C: Simple Topic/Payload Format
Topic: "sensors/humidity/room1"
Message: "65.2"
Result: Creates monitor point named "sensors/humidity/room1" with value "65.2"
Message Format Usage
When XPF Publishes (Outbound): - Complete JSON DTO: Used when Modbus Client tab is running and publishing monitor point data - Includes all Modbus configuration details for complete data reconstruction
When XPF Receives (Inbound): - Complete JSON DTO: Full compatibility with XPF-published messages (bidirectional) - Simplified JSON: Basic register details for external system integration - Simple Topic/Payload: Lightweight format for basic data injection
Bidirectional Compatibility: XPF instances can exchange complete JSON DTO messages for full monitor point synchronization between systems.
Step 3: Test MQTT Data Reception
- Start MQTT Connection
- Click Connect in MQTT panel
- Verify "Connected" status shows
-
Monitor connection log for successful subscription confirmations
-
Send Test Data
- Use MQTT client to publish to your subscription topics
- Monitor Points Grid should update immediately with new/changed values
-
Check Communication Log for received message confirmations:
text 14:33:13: MQTT Message Received: Topic: sensors/temp/room1, Payload: 24.8 14:33:13: Updated monitor point: sensors/temp/room1 = 24.8 -
Verify Independent Operation
- Monitor Points update regardless of Modbus Client/Server tab status
- Data flows into grid whether Modbus operations are active or not
- Real-time updates visible immediately upon message receipt
MQTT Data Reception Use Cases
External Sensor Integration:
Scenario: Weather station data via MQTT
MQTT Topic: "weather/station1/temperature"
Message: "18.5"
XPF Action: Update monitor point "weather/station1/temperature" with value 18.5
Display: Appears immediately in Monitor Points grid
Multi-System Data Collection:
Scenario: Combine Modbus device data with external IoT data
Modbus Data: Poll temperature sensors every 5 seconds
MQTT Data: Receive cloud weather data every 60 seconds
Combined View: Both data sources visible in same Monitor Points grid
Development & Testing Data Injection:
Scenario: Test monitoring dashboards without hardware
Test Process: Publish simulated sensor data via MQTT
XPF Display: Monitor points populate with test data immediately
Benefits: Full dashboard testing without physical Modbus devices
Security Considerations for MQTT Subscriptions
MQTT Subscription Security
MQTT subscriptions receive external data - implement proper security:
- ✅ Use TLS/SSL for all MQTT connections to prevent data tampering
- ✅ Implement authentication (usernames, certificates) to verify data sources
- ✅ Validate incoming data formats and ranges before display
- ✅ Log all received messages for audit trails and debugging
- ✅ Set topic permissions carefully to prevent unauthorized data injection
- ✅ Monitor data sources to detect compromised or malfunctioning publishers
Integration Example: Complete Monitoring Solution
Comprehensive monitoring setup combining multiple data sources:
Modbus Data Sources:
  - Poll local PLCs every 2 seconds for real-time process data
  - Update monitor points with current production values

MQTT Data Sources:
  - Subscribe to "weather/+" for environmental data every 5 minutes
  - Subscribe to "energy/grid/+" for utility data every 15 minutes
  - Subscribe to "alarms/external/+" for external system alerts

Unified Display:
  - All data sources appear together in Monitor Points grid
  - Real-time updates from both Modbus polling and MQTT subscriptions
  - No configuration dependencies between data source types
  - Complete system visibility in single XPF instance
For comprehensive MQTT connection setup, see: Secure Setup Guide and Complete Setup Examples sections above.
MQTT Communication Monitoring and Diagnostics
Understanding MQTT Statistics (TxxRxxExx)
The MQTT statistics display provides real-time insight into communication health:
Performance Monitoring:
Healthy Communication Patterns:
  - Steady T counter increases during publishing operations
  - Steady R counter increases when receiving subscribed data
  - E counter remains at zero or very low numbers
  - Counters resume increasing after connection recovery

Warning Indicators:
  - E counter increasing rapidly (connection/authentication issues)
  - T counter not increasing during expected publishing (connection lost)
  - R counter not increasing despite expected incoming data (subscription issues)
  - All counters stopped increasing (communication halted)
Troubleshooting with Statistics:
| Statistics Pattern | Likely Issue | Resolution |
|---|---|---|
| T000R000E005+ | Connection/authentication failures | Check broker settings, credentials, network connectivity |
| T123R000E000 | Publishing works, no received data | Verify subscription topics, check if external publishers are active |
| T000R089E000 | Receiving data, not publishing | Normal for receive-only configurations, or check publishing setup |
| T050R025E010 | Mixed success with some errors | Intermittent network issues, check broker stability |
| T000R000E000 | No activity at all | MQTT not started, or no monitor points configured for publishing |
Using Statistics for Optimization: - High T, Low R: Optimize publishing frequency to reduce broker load - High R, Low T: Perfect for data reception applications - Increasing E count: Investigate network stability, authentication, or broker capacity - Balanced T/R: Indicates healthy bidirectional MQTT communication
Advanced Configuration Reference
For comprehensive configuration beyond the tutorials, see the detailed sections below:
Start with Tutorials First
New users should complete the Quick Setup Tutorial or Secure Setup Guide before using these advanced references.
Advanced Topic Configuration
MQTT Topic Structure
Configure topic patterns for publishing and subscribing:
Publishing Topics (XPF to Broker):
| Topic Pattern | Example | Data Source | Description |
|---|---|---|---|
| Static Topics | plant/reactor1/temperature |
Monitor Point 1 | Fixed topic path |
| Dynamic Topics | {UnitID}/holding/{Address} |
Any Monitor Point | Variable substitution |
| JSON Topics | data/json |
Multiple Points | Structured JSON payload |
Subscription Topics (Broker to XPF):
| Topic Pattern | Example | Target | Description |
|---|---|---|---|
| Control Commands | plant/reactor1/setpoint |
Monitor Point Write | Receive control values |
| Configuration Updates | config/+/update |
System Settings | Dynamic configuration |
| Broadcast Messages | alerts/# |
Event Logging | System-wide notifications |
Configure Topic Mappings
- Set Up Publishing
- Topic Template: Define topic structure with variables
- Message Format: Choose JSON or raw value format
- QoS Level: Select Quality of Service (0, 1, or 2)
-
Retain Messages: Enable to store last value for new subscribers
-
Set Up Subscriptions
- Subscribe Topics: Define topics to listen for incoming messages
- Wildcard Support: Use
+(single level) and#(multi-level) wildcards -
Message Handling: Configure how received messages update monitor points
-
Variable Substitution
- {UnitID}: Replaced with monitor point Unit ID
- {Address}: Replaced with monitor point address
- {Name}: Replaced with monitor point name
- {Value}: Replaced with current monitor point value
Monitor Points Configuration
Need to configure monitor points first? See the comprehensive Monitor Points Configuration section in the main user guide.
Example Topic Configurations
Industrial Process Monitoring:
Publishing Topics:
  - "plant/line1/temperature" - Temperature sensor data
  - "plant/line1/pressure" - Pressure measurement
  - "plant/line1/flow" - Flow rate data

Subscription Topics:
  - "plant/line1/setpoints/+" - Receive setpoint changes
  - "commands/emergency/#" - Emergency stop commands
Multi-Device Installation:
Publishing Topics:
  - "devices/{UnitID}/data/{Address}" - Dynamic device data
  - "status/devices" - JSON status summary

Subscription Topics:
  - "config/devices/{UnitID}/+" - Device-specific configuration
  - "commands/broadcast" - System-wide commands
Advanced Message Format Configuration
For detailed message mapping and publishing options beyond the basic tutorials:
| Message Format | Content Example | Use Case |
|---|---|---|
| Raw Value | 25.4 |
Simple numeric publishing |
| JSON Object | {"value": 25.4, "timestamp": "2025-11-05T14:30:15Z", "unit": "C"} |
Structured data with metadata |
| Custom JSON | {"temperature": 25.4, "status": "normal"} |
Application-specific format |
Advanced Configuration Options: - Individual Topics: Each monitor point gets its own topic - Batched Topics: Multiple points in single JSON message - Filtered Publishing: Only publish when values change - QoS Settings: Configure Quality of Service (0, 1, or 2) - Retained Messages: Store last value for new subscribers
Complete Configuration Guide
For step-by-step configuration instructions, see: - Quick Setup Tutorial - Basic setup walkthrough - Secure Setup Guide - Production security configuration - Complete Setup Examples - Real-world implementation examples
Testing and Verification Tools
Documentation Approach
This guide uses external tools (MQTT Explorer) for verification screenshots to provide clear visual separation between:
- XPF = Publisher/Subscriber (the main application)
- MQTT Explorer = External verification tool (for documentation clarity)
In real-world usage, you can use XPF's built-in test tools exclusively - no external applications needed!
XPF's Built-in MQTT Test Tools
XPF includes integrated MQTT testing capabilities that save hours of setup time and eliminate the need for separate test applications:
Built-in Test Features
Integrated MQTT Client
- Test broker connectivity without external tools
- Send test messages to verify subscription handling
- Monitor message flow directly in XPF console
- Debug topic mapping and message formatting issues
Real-time Message Monitoring - View live MQTT traffic (TX/RX counters) - Console logging with timestamped message details - Connection status indicators and error reporting - Quality of Service (QoS) confirmation tracking
Rapid Development Workflow - Configure > Test > Debug > Deploy in single application - No context switching between multiple tools - Immediate feedback on configuration changes - Built-in message validation and formatting checks
External Verification Tools (For Documentation Clarity)
In this guide, we use MQTT Explorer as external verification to clearly show the separation between XPF (publisher/subscriber) and verification tool:
| Tool Role | Application | Purpose in Guide |
|---|---|---|
| MQTT Publisher | XPF (Client Mode) | Sending Modbus data to broker |
| MQTT Subscriber | XPF (Server Mode) | Receiving commands from broker |
| Verification Tool | MQTT Explorer | Visual confirmation of message flow |
Why MQTT Explorer for Documentation:
- Visual Clarity: Tree view shows topic structure clearly
- Popular & Free: Most widely used MQTT test client
- Clean Interface: Perfect for screenshots and tutorials
- Cross-Platform: Windows/Mac/Linux compatibility
- No Registration: Immediate download and use
MQTT Explorer TLS Support:
- Basic TLS/SSL: Supports standard TLS connections (port 8883)
- CA Certificates: Can validate broker certificates
- Username/Password over TLS: Works with HiveMQ Cloud
- Client Certificates: No mutual TLS support
- Advanced PKI: Limited certificate management
For Advanced TLS
For client certificate examples, we'll use HiveMQ WebSocket Client (built into broker dashboard) or XPF's built-in tools, as MQTT Explorer doesn't support mutual TLS authentication.
Real-World Usage
In production, you can use XPF's built-in test tools exclusively - no external applications needed! We use MQTT Explorer in this guide only to provide clear visual separation for learning purposes.
Complete Setup Examples
Tutorial Prerequisites
These examples assume you've completed the Quick Setup Tutorial for basic MQTT concepts. If you're new to MQTT, start with the tutorial first.
Example 1: HiveMQ Cloud with TLS (Production Setup)
Recommended for production - Secure, reliable, free tier available.

Step 1: Set Up HiveMQ Cloud Account
-
Create Free Account
- Go to HiveMQ Cloud
- Click "Get Started Free"
- Create account (no credit card required)
-
Create Cluster
- Click "Create Cluster"
- Select "Free" plan (100 connections)
- Choose region closest to your location
- Wait 2-3 minutes for cluster creation
-
Get Connection Details
- Click your cluster name
- Note the Cluster URL (e.g.,
abc123def.s2.eu.hivemq.cloud) - Click "Access Management" > "Add Credentials"
- Create username/password (save these!)
Step 2: Configure TLS Connection in XPF
-
Open XPF MQTT Settings
- Broker Host:
your-cluster.s2.eu.hivemq.cloud(from Step 1) - Port:
8883(TLS port) - Client ID:
XPF-Plant1-Device001(unique identifier) - Username: (from HiveMQ credentials)
- Password: (from HiveMQ credentials)
- Broker Host:
-
Enable TLS Security
- Check TLS/SSL checkbox
- CA Certificate: Auto-detect (HiveMQ uses standard certificates)
- Client Certificate: Leave empty (username/password auth)
- Verify Hostname: Checked
Step 3: Configure Production Topics
Publishing Topics:
  - "factory/line1/plc/{Address}" - Individual register data
  - "factory/line1/status" - JSON summary every 30 seconds
  - "factory/line1/alarms" - Alert messages only

Subscription Topics:
  - "factory/line1/setpoints/+" - Receive setpoint changes
  - "factory/line1/commands/emergency" - Emergency stop commands
Step 4: Test Secure Connection
- Click Connect - Should show "Connected (TLS)"
-
Verify in HiveMQ Cloud Console:
- Go to your cluster dashboard
- Click "Client Details"
- Should see your Client ID connected
Step 5: Verify Encrypted Communication
Option A: MQTT Explorer (Basic TLS) 1. Configure MQTT Explorer for TLS:
  - Host: `your-cluster.s2.eu.hivemq.cloud`
  - Port: `8883`
  - Protocol: `mqtts://` (TLS)
  - Username/Password: (your HiveMQ credentials)
  - Subscribe to: `factory/line1/plc/+`
Option B: HiveMQ WebSocket Client (Recommended for TLS)
-
Use Built-in WebSocket Client:
- In HiveMQ cluster dashboard, click "Try out Websocket Client"
- Automatically uses secure connection (WSS)
- Subscribe to your topics:
factory/line1/plc/+ - You should see encrypted data flowing
-
Monitor XPF Communication Log:
- Messages show "Published (TLS)"
- No certificate errors
- Connection remains stable
Production Setup Complete!
You now have secure, encrypted MQTT communication suitable for production environments!
Example 3: EMQX Cloud with CA Certificate
Production setup with EMQX Cloud using downloaded CA certificate - More secure than auto-detect.
Step 1: Set Up EMQX Cloud Deployment
-
Create EMQX Cloud Account
- Visit EMQX Cloud and create account
- Create a new deployment (Serverless or Dedicated)
- Note your deployment endpoint (e.g.,
caxxxx4e.ala.us-east-1.emqxsl.com)
-
Download CA Certificate
- In EMQX console, go to Deployment Overview
- Find MQTT Connection Information section
- Click CA Certificate download link
- Save the certificate file (e.g.,
emqx-ca.crt)
Step 2: Configure XPF with EMQX CA Certificate
-
Open XPF MQTT Settings
-
Configure CA Certificate
- Enable TLS/SSL checkbox
- Click CA Certificate button (file certificate icon)
- Browse to downloaded
emqx-ca.crtfile - Select the certificate file
- XPF displays certificate path
Step 3: Test EMQX Connection
-
Verify Certificate Configuration
- CA Certificate path should be displayed in XPF
- TLS/SSL should be enabled
- All connection details should be entered
-
Connect and Verify
- Click Connect - should show "Connected (TLS)"
- Check MQTT Debug Log for certificate validation:
text
  Certificate validation approved. Errors: None.
  Subject: CN=*.ala.us-east-1.emqxsl.com
  TLS encryption enabled. Using protocol: Tls12
  Connected to MQTT Broker
-
Verify in EMQX Console
- Go to EMQX deployment Monitor section
- Check Connections - should see your Client ID connected
- Verify connection shows as secure/encrypted
EMQX CA Setup Complete!
Benefits of using downloaded CA certificate: - ✅ Explicit trust chain - You control which CA to trust - ✅ No auto-detect vulnerabilities - Prevents potential CA spoofing - ✅ Certificate expiry tracking - You know when CA cert expires (2031.11.09 in example) - ✅ Compliance ready - Explicit certificate management for auditing
Example 4: Advanced TLS with Client Certificates
For high-security environments requiring mutual TLS authentication.
When to Use Client Certificates
- Industrial environments with strict security policies
- Multi-tenant brokers requiring device authentication
- Compliance requirements (ISO 27001, IEC 62443)
- Zero-trust networks where identity verification is mandatory
Step 1: Generate Client Certificates
Option A: Use OpenSSL (Self-Signed)
# Generate private key
openssl genpkey -algorithm RSA -out client-key.pem -pkcs8

# Generate certificate signing request
openssl req -new -key client-key.pem -out client.csr \
  -subj "/CN=XPF-Plant1-Device001/O=YourCompany/C=US"

# Generate self-signed certificate
openssl x509 -req -in client.csr -signkey client-key.pem \
  -out client-cert.pem -days 365
Option B: Use Your PKI/CA System
- Generate certificate through your organization's PKI
- Ensure certificate includes Client Authentication key usage
- Common Name should match your device identifier
Step 2: Convert to PFX Format (Windows)
XPF requires PFX format for client certificates:
# Combine certificate and private key into PFX
openssl pkcs12 -export -out client.pfx \
  -inkey client-key.pem -in client-cert.pem \
  -name "XPF-Plant1-Device001"
# Enter export password when prompted
Step 3: Configure XPF with Client Certificate
-
TLS Configuration:
- TLS/SSL: Checked
- CA Certificate:
ca.crt(broker's CA certificate) - Client Certificate:
client.pfx(your device certificate) - Certificate Password: (PFX password from Step 2)
-
Broker Configuration:
Step 4: Verify Mutual TLS
-
Connection Log Should Show:
text [INFO] TLS Handshake successful [INFO] Client certificate presented [INFO] Mutual authentication completed [INFO] Connected to secure-broker.yourcompany.com:8883 -
Broker Logs Should Confirm:
- Client certificate validation successful
- Device authenticated via certificate
- Connection authorized for configured topics
Certificate Management
- Monitor expiration dates - Set calendar reminders
- Secure private keys - Store PFX files securely
- Test certificate renewal before expiration
- Backup certificates in secure location
Troubleshooting
Common Issues and Solutions
Connection Problems:
| Issue | Cause | Solution |
|---|---|---|
| Connection refused | Wrong host/port | Verify broker hostname and port number |
| Authentication failed | Wrong credentials | Check username/password or certificate |
| TLS handshake failed | Certificate issues | Verify CA certificate and hostname matching |
| Connection timeout | Network/firewall | Check network connectivity and firewall rules |
Message Flow Issues:
| Issue | Cause | Solution |
|---|---|---|
| Messages not published | Topic permissions | Check broker ACL and topic permissions |
| Subscription not working | Wildcard errors | Verify topic patterns and wildcard usage |
| JSON parsing errors | Format mismatches | Validate JSON structure against schema |
| QoS delivery issues | Broker configuration | Check broker QoS support and client settings |
Diagnostic Tools
XPF MQTT Add-on Diagnostics:
- MQTT Statistics Display (TxxRxxExx): Real-time communication counters for monitoring message flow and error rates
- MQTT connection status indicator
- Message publish/subscribe counters
- Topic subscription management
- Communication error logging
MQTT Statistics for Troubleshooting:
| Error Pattern | Statistics Example | Diagnosis | Action |
|---|---|---|---|
| Connection Issues | T000R000E010+ | Authentication/network failures | Verify credentials, check network, test broker connectivity |
| Publishing Problems | T000R045E003 | Can receive but not publish | Check broker ACL permissions, verify topic permissions |
| Subscription Issues | T067R000E001 | Can publish but not receive | Verify subscription topics, check wildcard patterns |
| Broker Overload | T234R045E025 | High error rate with mixed success | Reduce publish frequency, check broker capacity |
| Network Instability | Fluctuating counters | Intermittent connectivity | Monitor network stability, consider QoS settings |
Built-in MQTT Debug Log: Access detailed connection, authentication, and message flow information via IoT Tab > MQTT Group > Debug Log button
External MQTT Tools:
- MQTT Explorer: Visual broker exploration and testing
- Mosquitto Client: Command-line publish/subscribe tools
- MQTT.fx: Desktop MQTT client for testing
- Online MQTT Clients: Web-based testing interfaces
Best Practices
Security Recommendations
- Use TLS Encryption: Always enable TLS for production deployments
- Certificate Management: Regularly rotate client certificates
- Topic Security: Implement proper ACL policies on broker
- Network Segmentation: Isolate MQTT traffic on dedicated networks
Performance Optimization
- Topic Design: Use hierarchical topic structures for efficient routing
- Message Size: Keep messages small for better performance
- QoS Selection: Use appropriate QoS for each use case
- Connection Pooling: Reuse connections for multiple operations
Monitoring and Maintenance
- Connection Health: Monitor connection status and automatic reconnection
- Message Throughput: Track publish/subscribe rates and errors
- Broker Performance: Monitor broker metrics and resource usage
- Security Auditing: Regular review of certificates and access logs
Use Cases and Examples
Industrial IoT Data Collection
Scenario: Collect data from multiple Modbus devices and publish to cloud MQTT broker
Configuration:
Publishing Topics:
  - "factory/line-{UnitID}/temperature" - Temperature sensors
  - "factory/line-{UnitID}/pressure" - Pressure transmitters
  - "factory/summary/json" - Combined status JSON

Message Format: JSON with timestamp and metadata
QoS: 1 (at least once delivery)
Retain: Enabled for status messages
Remote Control and Monitoring
Scenario: Receive setpoint changes from cloud dashboard
Configuration:
Subscription Topics:
  - "control/setpoints/+" - Individual setpoint changes
  - "commands/emergency" - Emergency shutdown commands

Publishing Topics:
  - "status/ack" - Command acknowledgments
  - "alarms/critical" - Critical alarm notifications
Edge-to-Cloud Integration
Scenario: Bridge local Modbus networks to cloud analytics platform
Configuration:
Local Collection:
  - Poll Modbus devices every 5 seconds
  - Aggregate data locally

Cloud Publishing:
  - Publish summarized data every 60 seconds
  - Use QoS 1 for reliable delivery
  - Include metadata for cloud processing
Support and Resources
Official Documentation
- MQTT Protocol: MQTT.org Official Specification
- Broker Documentation: Refer to your specific broker documentation
- XPF User Guide: Main user guide for core XPF functionality
- Monitor Points: Configuration guide for data source setup
Community Resources
- MQTT Community: Official MQTT forums and discussions
- Modbus Monitor Community: User discussions and examples
- Broker Communities: AWS IoT, Azure IoT, HiveMQ user groups
Additional Add-ons
This MQTT Add-on is part of a growing ecosystem of XPF add-ons:
- ThingSpeak Add-on: Dedicated ThingSpeak cloud integration
- Custom Add-ons: Contact us for specialized integration requirements
Navigation
Return to Main Guide
This Guide's Key Sections: - Quick Setup Tutorial - Complete beginner walkthrough - Secure Setup Guide - TLS/SSL and production security - Server Mode Guide - Bidirectional MQTT control
Related User Guide Sections: - Monitor Points Configuration - Configure data sources - Server Operations - Modbus server setup - Client Operations - Core client functionality
Next Steps: - Return to main user guide for core XPF features - Explore Monitor Points configuration - Check out ThingSpeak Add-on for cloud-specific features